JSON Web Tokens are an open, industry standard RFC 7519 method for representing claims securely between two parties.
A JWT is composed of a HEADER, a PAYLOAD and a SIGNATURE.
The followings are the steps to produce a JWT:-
Encodes HEADER by using base64url Sample HEADER data in JSON: { “alg”: “HS256”, “typ”: “JWT” }
Encodes PAYLOAD by using base64url Sample PAYLOAD data in JSON: { “sub”: “1234567890”,, “name”: “John Doe”, “iat”: 1516239022 }
Joins the encoded HEADER and PAYLOAD together with period (.), and signed with a secret key using the hashing algorithm specified in the JWT header.
HEADER.PAYLOAD.SIGNATURE
For example: eyJhbGciOiJIUzI1NiIsInR5cCI6IkpXVCJ9.eyJzdWIiOiIxMjM0NTY3ODkwIiwibmFtZSI6IkpvaG4gRG9lIiwiaWF0IjoxNTE2MjM5MDIyfQ.B6H4S0WFqJnNq8byQs9BUcnf9JEHbnSJ0oSvhLF1dkY
OAuth 2.0 specification defines 4 types of authorization flows (Authorization Code, Resource Owner Password Credentials, Implicit, and Client Credentials)
This post is only focus on the authorization code flow.
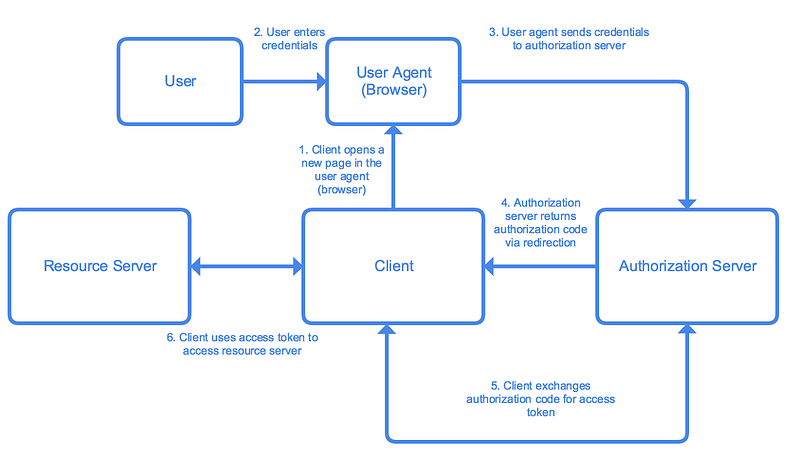
The followings are the steps of the flow:
The client / app makes and authorization requests to authorization server (e.g. Google, Facebook), and the authorization server returns an authorization page to client.
User enters credentials on the page (e.g. login id, password), and checks the permissions requested by client.
The credentials submitted to authorization server.
The authorization server validates the credentials and redirect user back to the client with an authorization code by using the redirect Url prepared at step 1 (See the sample request of step 1).
The client and the authorization exchanges the authorization code for an access token.
The client access resources on the resource server by providing the access token granted at step 5.
The followings are the sample request and response of the flow:
To set the environment variable in Linux permanently, you can insert the export command into startup file.
Example of command to set environment variable: export JAVA_HOME=/usr/local/java/jre1.8
There are several startup files in Linux environment.
To set environment variable for a particular user, you can use ~/bashrc, ~/bash_profile or ~/bash_login.
If you plan to set system wide environment variable, you can use /etc/profile, /etc/bashrc, etc/profile or create a custom .sh file in profile.d folder.
Here the execution sequence of the startup files:-
Interative login shell (e.g login remotely via ssh)
/etc/profile 1.1 all the .sh files in /etc/profile.d (*if any)
~/.bash_profile or ~/.bash_login or ~/.profile (*executes only the first of those files found)
If you seeing only 32bit version of OS but no 64bit as options while creating a new VM in your 64bit machine, it is probably that you need to turn on both Virtualization Technology and VT-d Feature options in your BIOS.



 The Normal Programmer